Set Up a Phone Campaign
In order to start routing and selling calls in your boberdoo system, you must set up an inbound phone campaign. Your campaigns allow you to segment all of your incoming calls as well as filter and sell those calls to the appropriate buyer for the appropriate price.

Phone Campaign Setup Guide
Step 1: Create an Inbound Phone Source
Inbound phone sources allow you to segment and track all calls that are routed through your system. While each phone campaign needs a source, you can decide whether you want to use one source for all campaigns or create a unique source for each campaign.
How to Create a Source
Go to Settings>Source/Vendor Settings>Inbound Phone and click the Add New Source button. The only fields used for Inbound Phone are Source Name, Vendor and Cost. Name your source, optionally assign it to a vendor, enter the amount you are paying for the call in the Cost field and click Add New.
Step 2: Set Up an Inbound Phone Campaign
Now that you have created a Source, go to the Phone Routing tab and click Add New. Name your campaign, add an internal name (visible only by the Admin), add the vertical name (used for organizational purposes) and any notes you wish to keep. Once you click Add New, your campaign is created.

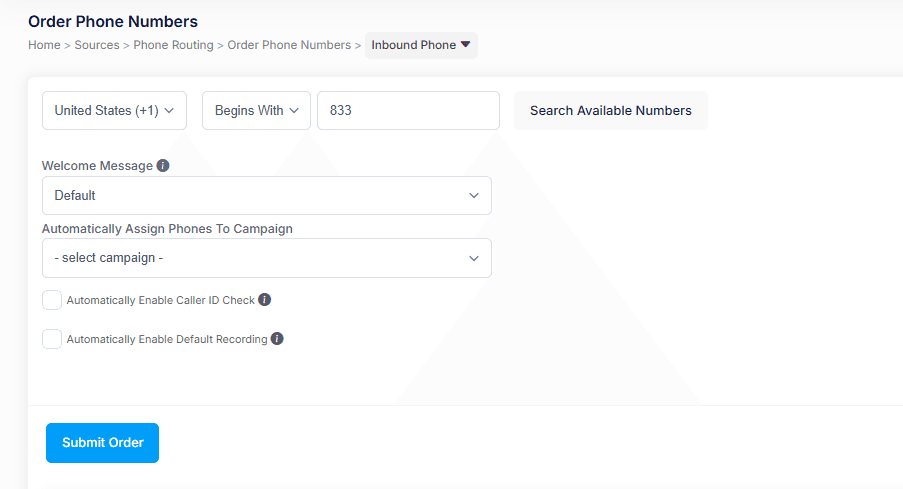
Step 3: Order a Phone Number
From the Phone Routing tab, select the Order Phone Numbers subtab. Use the US Toll Free tab at the top of the menu to order a standard toll-free number. For local international or US numbers, contact us for details. Select the number of phone numbers you would like to order as well as a welcome message.
Configure Your Phone Number
Enter a Default Phone Number. Calls will be routed to this number if you have no available buyers when the call comes in. Most clients put their office line or a voicemail to receive these calls. Next, assign your number(s) to the campaign and source you created in steps 1 and 2. Select whether you want to enable the caller ID and/or duplicate checks and submit your order. Your numbers should only take a few minutes to order.
Step 4: Set Up a Partner/Buyer
Now that you have created a phone campaign and attached a number to it, your final step is to set up a partner/buyer to purchase your calls. If you don't know how to create a partner, watch our how to video.
Step 5: Create a Filter Set
Once your partner is created you need to add a filter set to his/her account. Filter sets for inbound phone calls work the same as web lead filter sets except for a few additional settings. For a complete list of filter set definitions, click here. Also see our guide on creating a filter set.
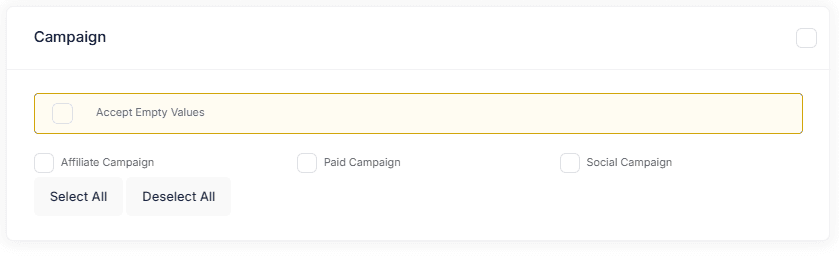
Configure Campaign Filters
Before you save your filter set, set your custom filter options at the bottom of the filter set. The most important custom filter is Campaign. You must select which campaign(s) this buyer can purchase from. You can also filter based on additional fields such as zip code or other custom fields by setting up a custom IVR. To do so, create a ticket or contact support.
Step 6: Set Up Invoicing/Billing
The system requires your buyers to have available funds in their account to purchase any leads. Go to your Partners tab, select your partner, then click Invoicing/Billing tab on the left side navigation bar to configure your partner's billing method. To learn more about your billing options, click here.
Doing live transfers?
If you want to do live transfers in your system, the process is a little different from the standard inbound phone campaign. Learn more about live transfers. If you have any questions or need help setting up your phone campaign, contact support.
Ready To Get Started?
Fill out the form below to schedule a demo with one of our lead distribution experts.