Setting Up A Vendor
In the boberdoo system your vendors represent your individual lead sellers. For each lead seller, you must create a unique vendor account which allows them to post leads into your system and allows you to properly track and segment those leads. Each account comes with its own vendor login that you can give to your lead sellers at your own discretion.

Creating A Vendor Account
Getting Started
To create a vendor account, go to Settings>Manage Vendors and click the 'Add New' button. You will then be prompted to fill in all relevant information for this specific lead seller.
Login & Status
Login – The login and password is used by your vendor when logging into their vendor account. You can give logins to only those you wish and customize permissions individually. Status – Your vendor's status must be set to active to sell and post leads into the system.
Additional Vendor Settings
Contact Information is used for your internal reference only. Suppression Files let you send vendors a list of emails you do not accept (plain text or encrypted MD5). Rate is an internal rating system. Type of Payments and Minimum Amount of Payment are for your internal reference. Once created, you can access/edit the account settings and vendor admin permissions at any time.
Creating A Source
The most important step when setting up a vendor is creating a source. The source tells you where your leads are coming from and tells the system what actions to take for leads from this source. Each vendor must have at least one source, but you can create multiple sources for the same vendor.
Providing Information to Your Vendor
Direct Post: Step 1 – Lead Type Posting Specs
Go to Settings>Lead Type and select the lead type they will be posting to. At the top of this window you will see a link containing the exact posting instructions that you can give to them.
Direct Post: Step 2 – SRC Value
The SRC value is the specific source name you created when building this vendor's source setting. Once your vendor has the SRC value, they can enter it at the top of the lead type posting specifications page and it will automatically insert their SRC value.

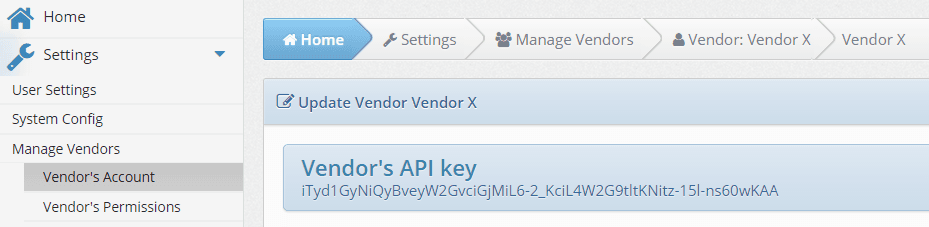
Ping Post: Step 1 – Vendor API Key
Go to Settings>Manage Vendors and select the vendor. Their unique API key is listed in the header of their account page.

Ping Post: Step 2 – Ping Post Instructions
Go to Settings>API Specs and select pingPostLead. Select the appropriate lead type to display the ping post specifications and a link you can provide to your vendor.
Ping Post: Step 3 – SRC Value
The SRC value is the specific source name you created when building this vendor's source setting. Once entered at the top of the ping post instructions page, it will automatically insert their SRC value.
Frequently Asked Questions
Go to Settings>Manage Vendors and click 'Add New'. Fill in the login, status, contact information, and other relevant fields for your lead seller.
A source tells the system where leads come from and what actions to take for those leads. Each vendor must have at least one source, but can have multiple.
Provide them with the lead type posting specifications (from Settings>Lead Type) and their SRC value (the source name you created for them).
Provide them with their Vendor API key, the ping post instructions (from Settings>API Specs), and their SRC value.
Ready To Get Started?
Fill out the form below to schedule a demo with one of our lead distribution experts.