How To: Create A New Partner
The video shows you how to configure and create a new partner account within your boberdoo.com lead distribution system.
boberdoo.com How To – Create a New Partner
boberdoo.com How To – Create a New Partner
Before you can start selling leads to your buyers, you need to set up a Partner account for each. To do so, access the Partners tab and click Add New Partner. You will be taken through a six-step process to build the Partner account. For a quick overview, watch the video below.
Configuration Options
There are many configuration options available when adding a Partner account. By default, the most common settings are pre-activated. You aren't required to adjust or input any specific settings in order to create a Partner. All settings can be adjusted at any time after the Partner is created.
Step 1: Contact Information
Enter the contact information for your Partner. The Login and Password fields allow your Partner access to their own login if you choose to provide credentials. The remaining fields are for your internal reference only. The Partner's company name and First and Last name appear throughout the system to identify the specific partner.
Step 2: HTML Offer
This optional section allows you to add HTML code returned in the XML response when a lead matches to this Partner account. The HTML code can only be returned if the SRC is set to "Response Type=Full".
HTML Offer Use Case
The "Full Response" contains the normal "Matched" status along with the Lead ID value and returns an "<offer></offer>" node with the matching Partner's HTML Offer code. This is commonly used when building a custom landing page that displays the matching partner after generating a lead and redirecting them to your thank you page.
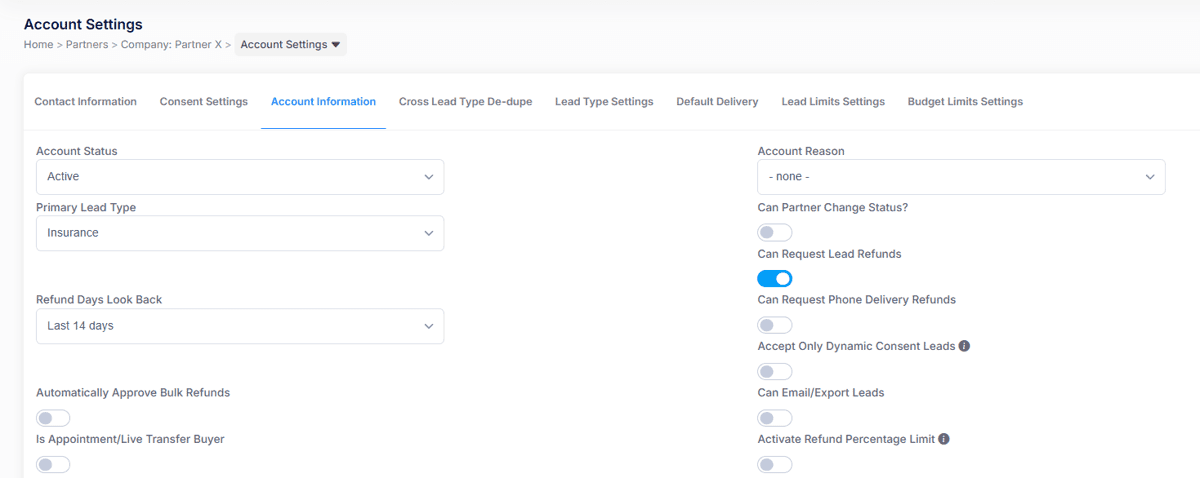
Step 3: Account Information
Account Status & Basics
Account Status: Set your Partner to Active (can receive leads), Not Active (cannot receive leads) or Temporarily Stopped (cannot receive leads – this means the Partner temporarily stopped their own account from the Partner login).
Account Reason: An internal value that you can set that identifies why an account is set to Not Active or Temporarily Stopped. E.g. 'Vacation', 'Awaiting Payment' or 'Suspended'. These values can be added at Settings>Account Status Reasons.
Primary Lead Type: This is used only as an internal organizational tool used to help you quickly identify the main lead type in which this partner purchases leads. This is a field used in the 'Partner List' report.
Can Partner Change Status?: This switch allows your Partners to change their account status from the Partner login.
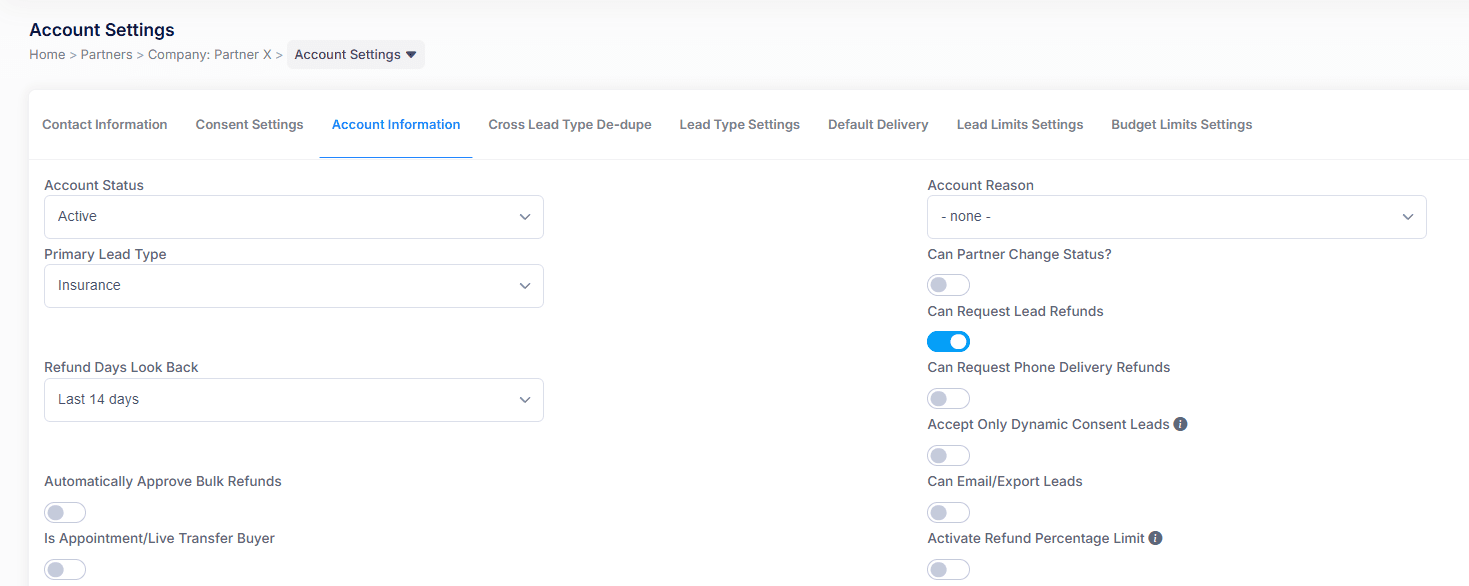
Funding & Refunds
Ability to Add Funds: This switch allows your Partners to add funds to their account from the Partner login.
Can Request Lead Refunds: This switch allows your Partners to request lead refunds from the Partner login.
Refund Days Look Back: If you allow your clients to request lead refunds, you can utilize this setting to determine which leads (based on the age of the lead) are eligible to be refunded.
Can Request Phone Delivery Refunds: This switch allows your Partners to request refunds on calls from your Inbound Phone Routing lead type.
Automatically Approve Bulk Refunds: This switch tells your system to automatically approve all bulk refund requests. If deactivated, you will have to manually review each request.
Visible Account balance for Partner: This switch allows your Partner to see their account balance from the Partner login.
Partner Permissions
Can Email Leads: This switch allows your Partners to export leads from their Leads tab.
Is Appointment/Live Transfer Buyer: This is used as an internal identifier that is only used in specific cases.
Partner is Invoice: This setting is used as an internal organizational tool. For example, when running the 'Partner List' report, you can identify each Partner that is listed with 'Is Invoice'.
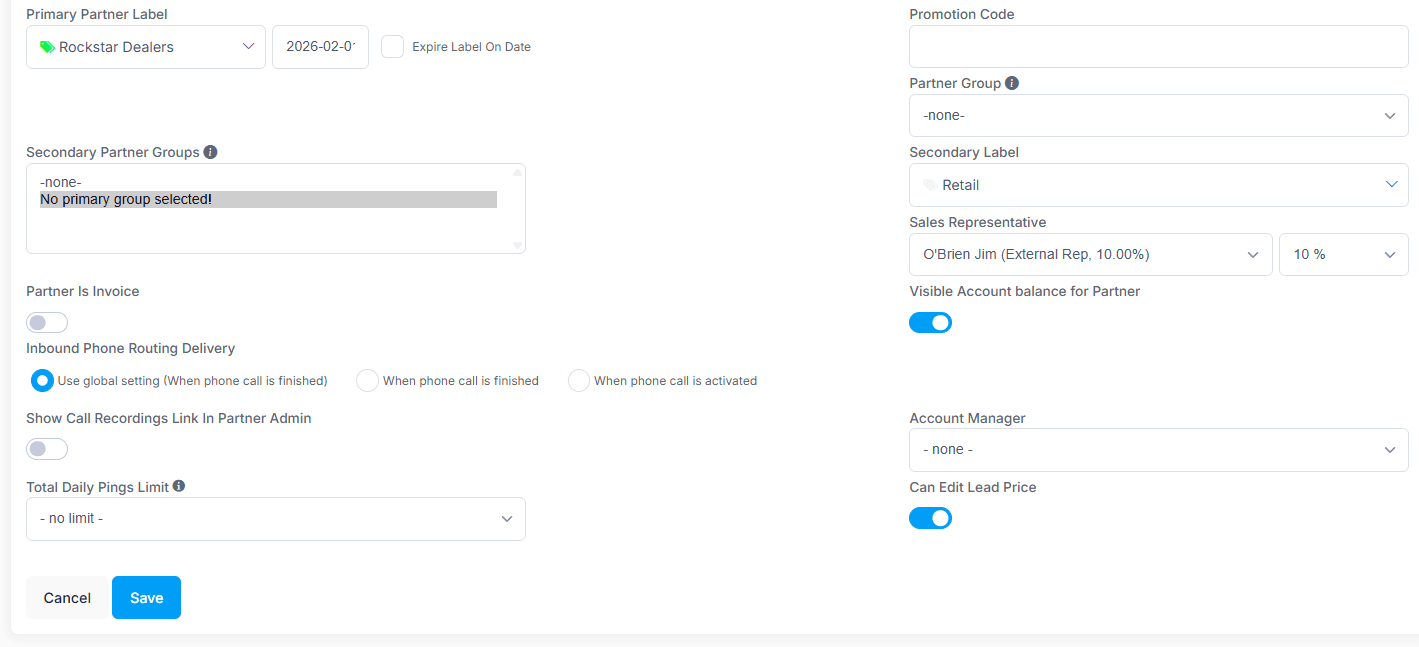
Labels & Organization
Primary Partner Label: This label is an internal organizational tool. You can sort your Partner list by color-coded Partner Labels and run reports accordingly. You can create Partner Labels at Settings>Manage Partner Labels.
Secondary Label: This setting gives you the option to add an additional Partner Label to your Partner.
Promotion Code: This is a generic text field that can be used in any way for your internal use. Some boberdoo users use this field with automatic sign ups to determine the origin of the partner or as an internal identifier.
Partner Groups & Sales
Partner Group: Partner Groups allow you to prevent selling the same lead to more than one Partner in the same Partner Group. To create a Partner Group go to Settings>Manage Partner Groups.
Secondary Partner Groups: This setting gives you the option to add one Partner into multiple Partner Groups.
Sales Representative: This setting allows you to attach a sales representative to your Partner's account and a corresponding commission percentage paid out for every lead that is sold to that Partner. In the boberdoo system, sales representatives have their own login where they can see which Partner accounts they are attached to. To add a sales representative go to Settings>Sales Representative.
Sub-partners: Sub-partners is a seldom used feature. The current best practices are to create multiple filter sets in the partner account. Sub-partners are rarely used anymore. If you think you need sub-partners, please open a ticket with your use case and we can advise.
Phone Routing Settings
Inbound Phone Routing Delivery: This setting is only utilized for Partners that purchase phone calls (meaning they have a Lead Filter Set created for Inbound Phone). This setting determines when the lead details delivery is made for a phone call that is received. When phone call is finished: The delivery is made when the Partner disconnects from the phone call. When phone call is activated: The delivery is made as soon as the Partner picks up the phone call.
Show Call Recordings Link In Partner Admin: This switch allows the Partner to listen to the recordings of their inbound phone leads from the Partner login.
Total Daily Pings Limit: This setting allows you to limit the number of pings that you can send your Partner each day.
Steps 4–6: Lead Type, Cherry Picker & Lead Limits
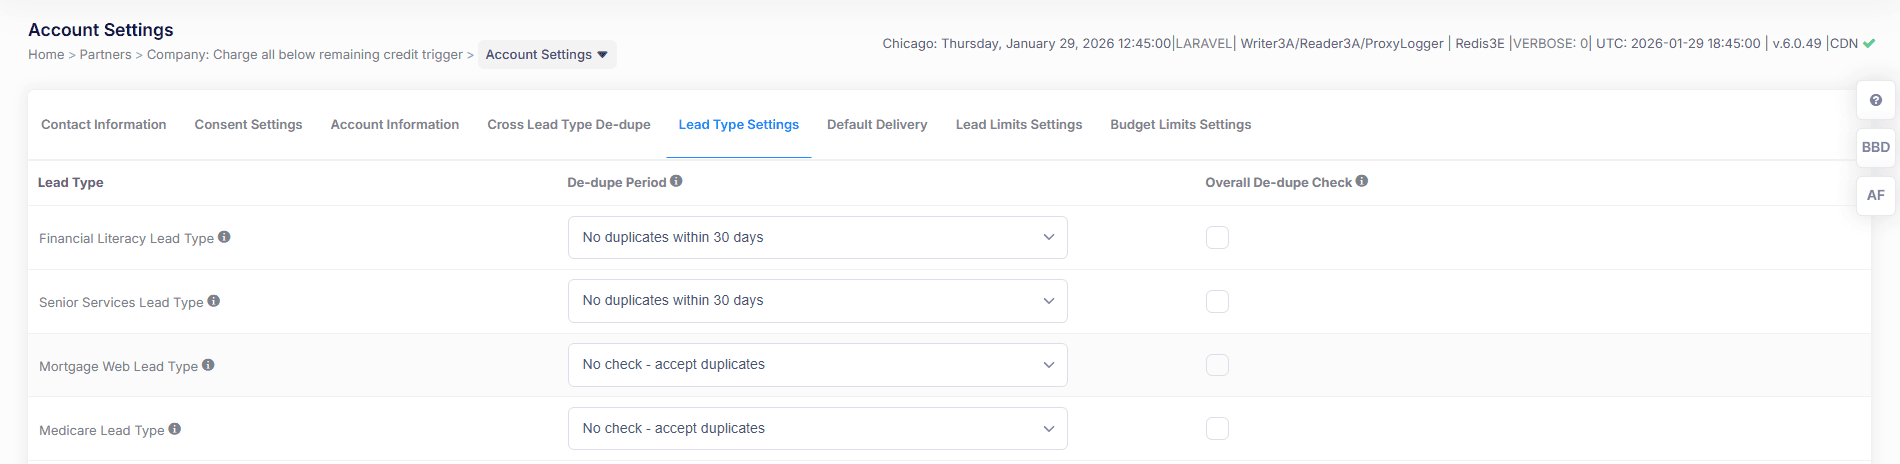
Step 4: Lead Type Settings
This section lists every lead type built into your system and allows you to configure specific settings that override your global settings for this Partner only.
Lead Type De-Dupe Options
De-dupe Period checks if a lead with the same duplicate check fields has been sold to this Partner in the selected timeframe. If it was, the lead is not sold. You can also override the dupe check to accept duplicate leads. Overall De-dupe Check verifies if a lead has ever entered your boberdoo system before; if so, it cannot be sold to this partner.
Cherry Picker Visibility
This setting allows you to enable or disable this Partner's access to the Cherry Picker for each lead type. If you see "Cherry Picker for this Lead Type is disabled", go to Settings>Cherry Picker to enable it.
Step 5: Cherry Picker Deliveries
This section is only used if your Partner has access to the Cherry Picker. From here, identify the delivery option, delivery email and delivery frequency used when the Partner purchases a lead from the Cherry Picker. By default, the system uses a standard HTML delivery sent to the email in the Partner's Filter Set.
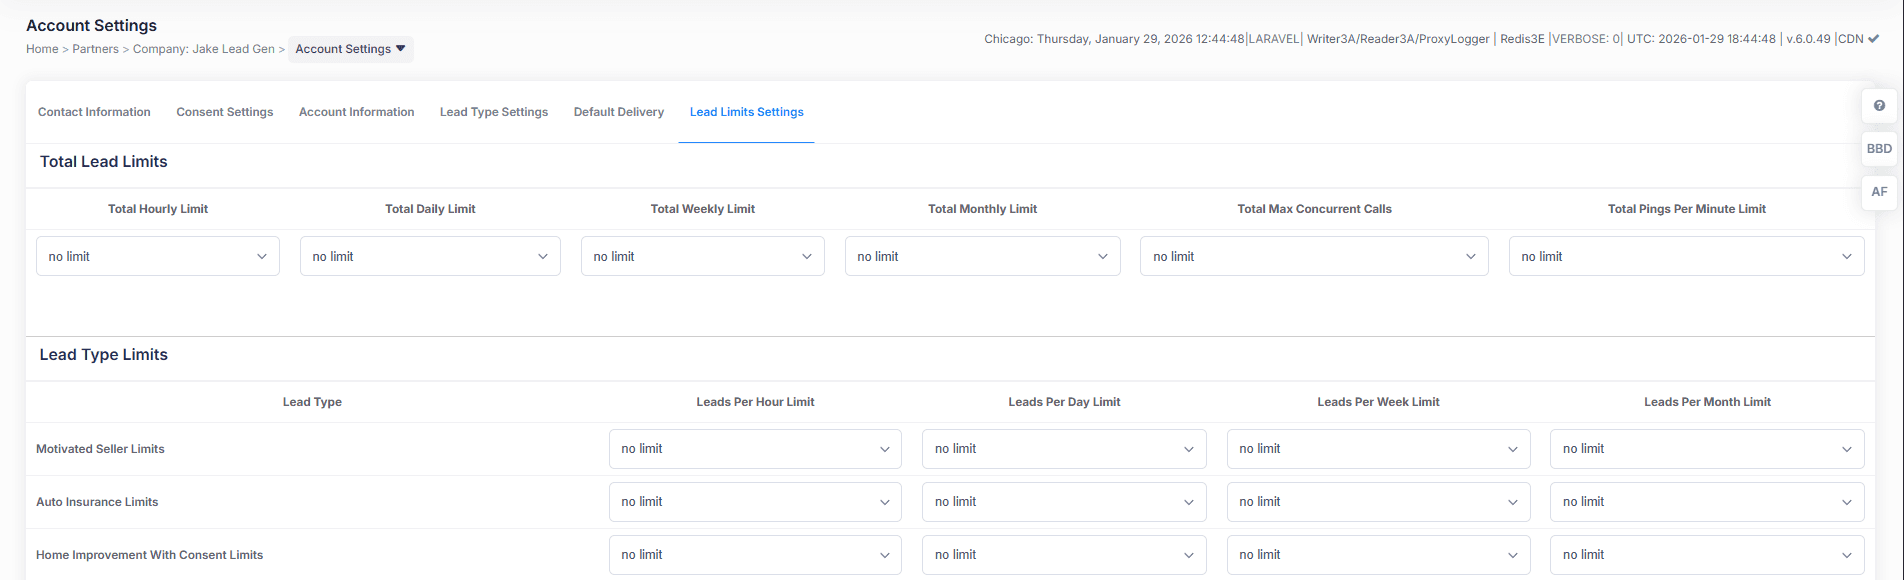
Step 6: Lead Limits Settings
The Lead Limits Settings allow you to set account-level and lead-type level lead limits. Set daily, weekly and monthly limits that, when hit, prevent the partner from buying additional leads for that time frame. Most boberdoo users set lead limits at the filter-set level, but this setting provides an additional layer.
I Created My Partner – What’s Next?
In order for your Partner to start purchasing leads, you need to finish setting up your lead buyer. If you have any remaining questions about creating Partner accounts, use our live support chat.
Frequently Asked Questions
Access the Partners tab and click Add New Partner. You will be taken through a six-step process: Contact Information, HTML Offer, Account Information, Lead Type Settings, Cherry Picker Deliveries, and Lead Limits Settings.
No. By default, the most common settings are pre-activated. You aren't required to adjust any settings in order to create a Partner. All settings can be adjusted at any time after creation.
You need to finish setting up your lead buyer so the Partner can start purchasing leads. Use our live support chat for any remaining questions.
Ready To Get Started?
Fill out the form below to schedule a demo with one of our lead distribution experts.