Auto Rebilling Options in boberdoo
Automate your payment processes with boberdoo's auto rebilling system. Simplify recurring billing and enhance customer experience with seamless integration.
Implementing Auto Rebilling
Overview
Automated rebilling is one of the most advanced ways to handle your billing within the boberdoo system. Our auto rebilling options are integrated with Authorize.net CIM, Braintree and Stripe.

Authorize.net CIM
There is a difference between a base authorize.net account and authorize.net CIM. We cannot tell which kind you have unless you provide us with logins (which we do NOT recommend for security reasons). Authorize.net CIM is an add-on service for your Authorize.net account that allows you to tokenize and store customer payment information on Authorize.net's secure servers. With CIM, boberdoo can process the recurring charges on a time or trigger basis. CIM helps to process payments for returning customers with saved cards, as cards are saved securely on Authorize.net's servers for reuse and your lead system simply uses a 'token' tied to that card to process payments.
Getting Started
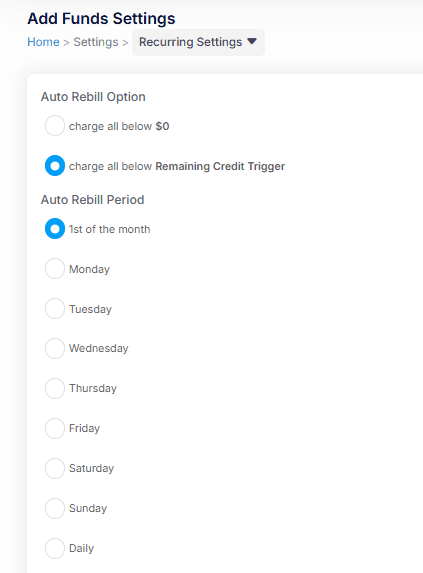
Before continuing, please log in to your system and go to Settings>Add Funds Settings and confirm that Authorize.net CIM or Braintree appears as an option and is enabled. If it does not appear or there is a warning notification, please open up a ticket so we can activate the auto-rebilling feature.
For definitions of the Authorize.net CIM Add Funds Settings, click here.
For definitions of the Braintree Add Funds Settings, click here.
For definitions of the Stripe Add Fund Settings, click here.
Auto Rebilling Options
Auto Rebilling Options
In the boberdoo system, there are three options for using the auto rebilling feature plus a method for testing your merchant account.
1. Charge All Below $0
This billing option works similarly to a credit card, with an automatic payment made on a certain date. You can rebill on the first of the month or weekly on any day of your choosing. Give the buyer a "Credit Limit" under their Invoicing/Billing page. This credit limit is the maximum amount they can go negative. Once they reach that threshold, they cannot buy more leads until the balance is paid off.
Setting Up Charge All Below $0
If the Auto Rebill Period is set to "1st of the month", the buyer will be charged on the first of the month for the total dollar amount they owe. You also have the option of having the auto rebill take place weekly on the day of your choice. To apply this option to the individual partner, access their invoicing/billing page and where it says "Value For Notification Email/Rebill Amount" select "Auto". The rebill amount is not used in this scenario because the system is already billing the total dollar amount below $0.
2. Charge All Below Remaining Credit Trigger
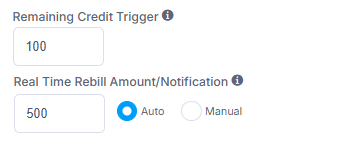
This option requires your buyers to deposit funds via credit card into their account. You then set a threshold that, when hit, triggers an automatic rebilling of a set amount. For example, your buyer deposits $500 and you set a rebill amount of $400 to trigger when the account balance hits $100. The buyer purchases leads until their balance hits $100, at which point the system immediately rebills $400 and the balance returns to $500.
Setting Up Remaining Credit Trigger
Access the partner's invoicing/billing page and where it says "Value For Notification Email/Rebill Amount" select "Auto". Include the rebill amount (e.g. $400). Where it says "Remaining Credit Trigger" enter the threshold limit (e.g. $100). You can also utilize the "Maximum Monthly Spend" switch to prevent overbilling.
3. Recurring Charges
This feature allows you to automatically charge your buyer a set amount on a weekly or monthly basis. To enable this feature, follow the same instructions used for enabling auto rebilling. You will see options for Monthly Recurring Charge Period and Weekly Recurring Charge Period.
Setting Up Recurring Charges
Use the Monthly and Weekly Recurring Charge Period tools to identify exactly when the charge will be made. The monthly or weekly option is set individually at the partner level. Go to Partners>Edit Partner>Invoicing/Billing to set the Recurring Charge Amount and Maximum Spend for your partner.
4. Testing Your Merchant Account
Access one of your Partner/Buyer accounts and go through the process your partners would. Go to your Partners tab and select either a live partner or a test partner account. Click the Go To Partner Admin button to access the partner portal. Once in the partner's login, go to Add Funds and enter a credit card.
Testing Cards
We recommend using one of the testing cards (Authorize.net CIM, Braintree) listed in our documentation to complete the process. If you have any other questions about the auto rebilling feature, feel free to contact us.
Frequently Asked Questions
There are three options: "Charge All Below $0" (automatic payment on a set date), "Charge All Below Remaining Credit Trigger" (automatic rebill when balance hits a threshold), and Recurring Charges (set amount charged on a weekly or monthly basis).
It works similarly to a credit card with automatic payment on a certain date. You set a credit limit for the buyer, and when they reach that threshold, the system charges the total amount owed on the first of the month or weekly.
Buyers deposit funds via credit card into their account. You set a threshold that triggers an automatic rebill of a set amount when the balance drops to that level. For example, a $400 rebill triggers when the balance hits $100.
Access a Partner/Buyer account, go to Add Funds, and enter a testing card from the Authorize.net CIM or Braintree testing cards listed in our documentation.
Ready To Get Started?
Fill out the form below to schedule a demo with one of our lead distribution experts.